Friday, January 27, 2012

Our New Menu Chart

Last weekend I had the urge to get crafty, and I knew exactly what I wanted to make. I've seen a lot of  menu charts on Pinterest lately and thought it was a fun and pretty way to plan out our menu for the week. For me, figuring out what we're going to have is the hardest part of cooking, and so far, this has made it much simpler! YAY!

There are lots of ways to make these, but the basic idea is to have your "go-to" menu items on slips of paper, along with some blank ones for new recipes and a simple Sunday-Monday chart to mix and match the papers on. Some are super complicated with main dish, sides, desserts, etc., but I knew I wouldn't keep up with that. It had to be super simple for me and it's usually just the main dish I have a hard time coming up with so I stuck with just that.

Anyway, I actually took pictures of the process for this in case someone else would like to make one of their own. Sorry for the poor lighting in the pictures, I was working late into the night. If you click on the picture, you can see the details better.

Step one: gather supplies.
I used Photo Shop and a digital scrap book kit I got from Just So Scrappy to make some clip art to use, but you could easily use any paper and stickers you may already have. The main part of my chart was the chipboard backing piece from one of Michelle's large art pads. I saved it a while ago knowing I would find a use for it someday. :o) I also had some 5x7 galvanized metal flashing pieces left from another craft project. You can find these at a hardware store. I pulled out a clipboard to add to the side for notes and/or grocery list, but ended up not using it since there wasn't room.
 Step Two: assemble
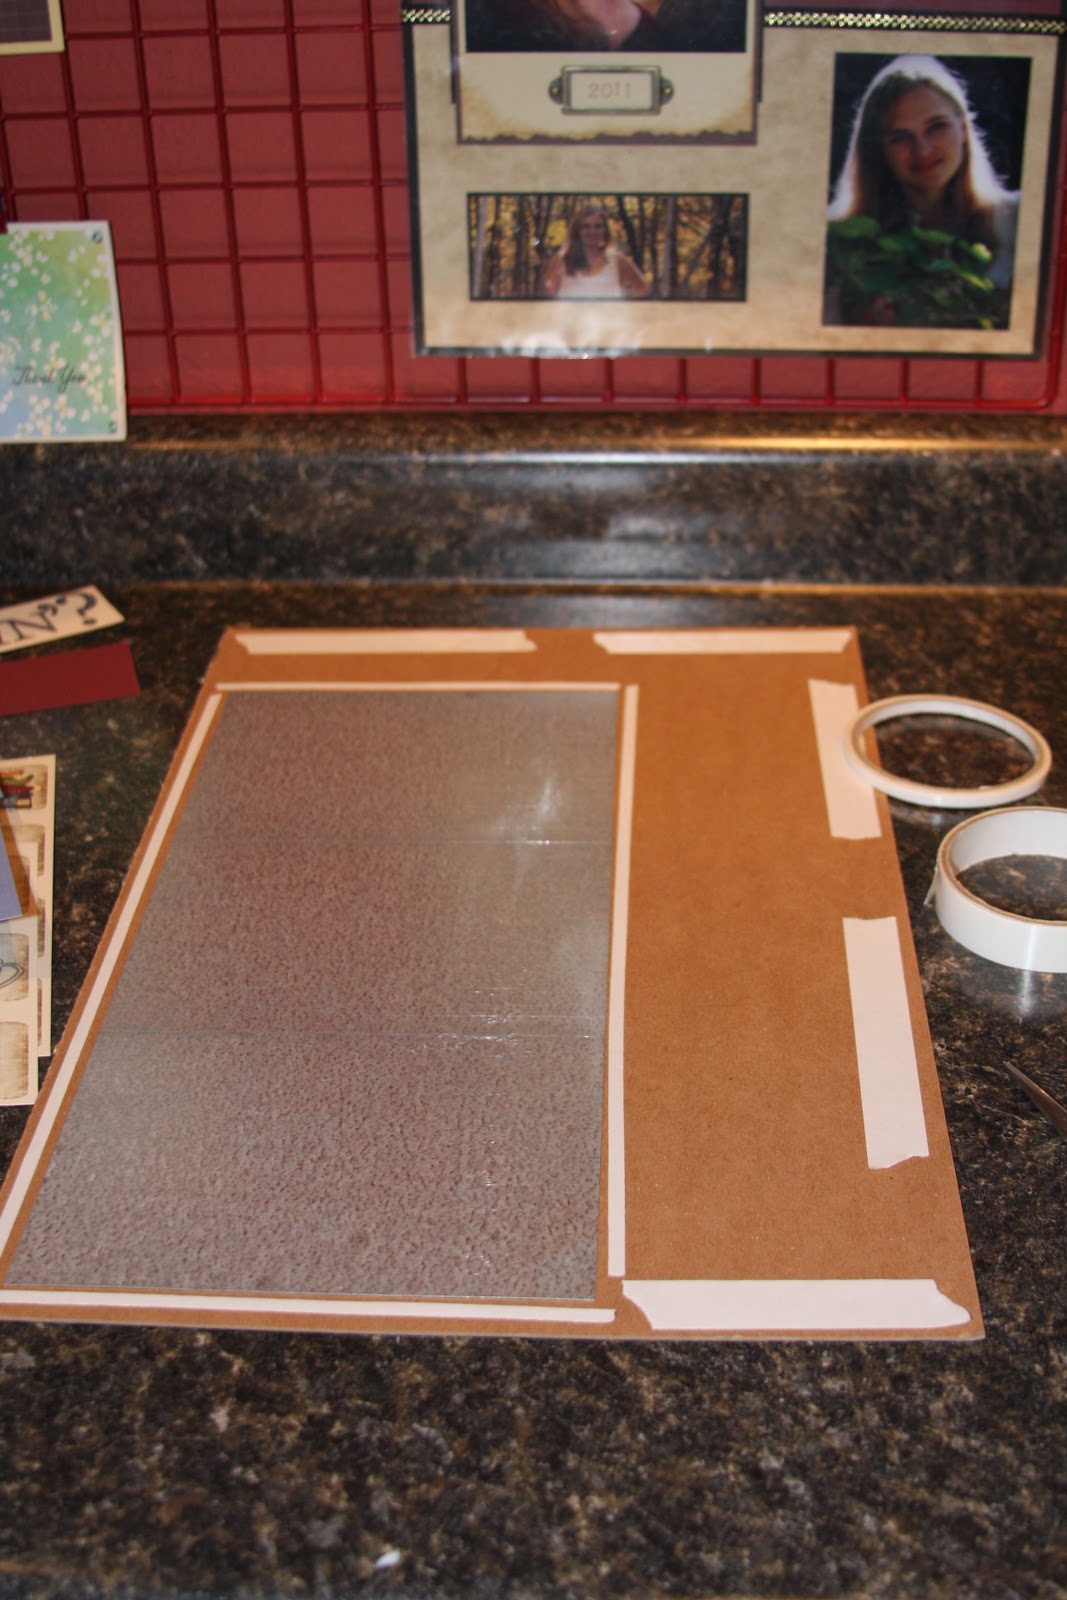
I used double-sided tape to adhere the flashing to the backing piece, then I used more tape to adhere cardstock over everything. You can see that I used some of my super skinny tape around the flashing and the wider stuff everywhere else. My backing is 12x18 so I had to use 2 12x12 pieces of cardstock cut to fit and pieced together.
 Here it is before the cardstock. The left side of my board is now magnetic!
 Then I played around with the arrangement of things before gluing anything down. Here I tried keeping the days of the week all together.
 Here I cut them out and played around with different layouts. I also used my Big Shot to cut out two small envelopes to hold my menu items.
 Here it is almost finished. I edged the whole thing with some ribbon, including the line where the two pieces of cardstock meet. I used glue dots to stick some buttons onto magnets to hold my menu items to each day's file. I hung a post-it pad sideways under the notes section (that's the only one I had on hand, and that's how it fit) to write down which cook book I may find a recipe in or if I have an idea for a new side dish or dessert that I'd like to try.
 Step three: hang up and use
Here it is hanging on the side of the fridge. I strung a ribbon between two eyelets to hang it from. I did find that the flashing made it slightly heavier on that side, so I'm using two hooks to help hang it evenly, and the magnetic pencil holder on the bottom helps to keep it straight as well. I printed three rows of clip art buttons down a sheet of paper and cut the paper into strips. I then wrote down most of the recipes that I make all the time (spaghetti, tacos, enchiladas, etc.) and have a bunch of empty ones to fill out as time goes by. Now, on Saturday, I simply take off last week's menu and pick out some new ones, using the button magnets to hold them on. It's also super simple to make changes in the middle of the week if need be.
So far, so good. I made this 2 weeks ago, and it has made dinner time much easier for me. I take a peek at it at night to see what meat needs to be taken out of the freezer or whether I need to get things into the crock pot first thing in the morning. I think having a list of things already written down makes it easier to make decisions. In fact, it's been so easy, I may try adding one new recipe a week to the rotation.

What do you think? I like that it's easy, organized, and looks nice too. I actually have been working on several other projects, but I'll have to post them some other time. It's getting late, and this mommy is tired.

Till next time...God's love and blessings!

Monday, January 16, 2012

Christmas Projects-Part 1

Every year I make ornaments for my niece and nephews. I try to use a different medium each year. This year I used Sculpey modeling clay. With all the modeling I've been doing in fondant and gumpaste for my cakes, I figured Sculpey shouldn't be too difficult. It was a bit different, but it was a lot of fun. I didn't get any individual shots, but here's a group shot of all the finished ornaments.


My photography skills are terrible. I wish I had a better shot, especially of the gingerbread men. They had a bunch of different candies at their feet. Maybe I'll get my sis to send me a picture of Tyler's. I have two nephews who don't celebrate Christmas so I just made them snowmen without the candy cane. I felt bad that I spent all this time on these, but didn't spend a little extra time to wrap them better when I shipped them out. My sister said she had a bit of repair work to do on a couple when she got her box. Now I know. Wrap better!

Anyway, I will close this here. I'll try and post pics of a couple other projects I did for Christmas later.

Till then...God's love and blessings!

Sunday, January 1, 2012

Still trying to catch up

Welcome 2012! 

Here's a quick look at two more cakes I did in 2011.


Here's a wedding cake. I made close to 1,000 little flowers for this cake. I also decided that I do NOT like working with red velvet cake. It's just so soft and does horrible things to fondant. If I ever try it again, I will try covering it with ganache before the fondant. This was the main cake. I also made 4 sheet cakes with matching flowers on them for the majority of the guests.


This cake was for our church fellowship supper in November. It was a pretty quick one to do. I like working with chocolate clay for the vines.

Looks like only a couple more and I'll be caught up on the cakes I did this last year. Hope you enjoy seeing them. I really enjoy making them and learning new techniques. Such a fun, and yummy, hobby. :o)

Till next time...God's love and blessings!

--Update--I seem to be getting a bit of traffic on this post from pinterest. Thanks for looking. I recently started a blog dedicated just to my cakes. If you're interested, please visit Tammy's Frosted Memories. Thanks!

Saturday, December 31, 2011

Happy New Year!

Happy New Year!! It will be in a couple of hours anyway. We were supposed to go to church tonight to ring in the New Year, but it was canceled due to a snow storm. I was going to work on putting away Christmas decorations, but Mike told me to go play in my office instead. :o) So, here I am with unexpected time on my hands and thought I'd use it by updating the blogs a bit and maybe planning out some projects for the new year.

This is a cake I did a couple of months ago. It was a blast to do. Although, I modeled the plumber several days in advance and had his back-side staring me in the face every time I went in the kitchen. :o) Looking at the pictures, I realize I still need to work on my modeling skills. There's a lot of wobbly lines and stuff, but I do see an improvement in the covering of the cakes in general. They don't look quite as bumpy as before. I also got a lot of practice using luster dusts on this one. The pipes and metal items are all gray fondant covered in a silver luster dust. That was hard to do without getting it all over. In fact, I think I'm still seeing a slight shimmer to my work table. ;o)

This gentlemen was retiring from plumbing and is a Vikings fan so I had to work purple in there somewhere.


I love Angel's idea for the dirty hand print on the towel. 

I made cupcakes to go along with the main cake. The tools are molded chocolate.
Well, that's it for tonight. I wish I could say I will do better at blogging consistently in 2012, but there is so much going on in life, and frankly, this blog takes a back seat to the more important things. I will do my best to set aside time to blog, but I'm not guaranteeing anything. Till next time, I honestly pray that you will feel God's love and blessings in 2012.

Friday, December 30, 2011

Michelle's Birthday Cake

Blogging consistently is really not my thing. Maybe I need to set aside a certain time each week to update the blogs. Anyway, here are some pictures of Michelle's birthday cake from September. I had a fun time making this cake. I think the caterpillars were my favorite.


I'm going to keep this short and sweet. I have a basket of mending that has been waiting patiently (or not so patiently) for the holidays to get over so I could tackle it. Guess now is the time. I'll do my best to post the plumber cake tomorrow.

Till next time...God's love and blessings!

Monday, November 14, 2011

Sewing Basket Cake

I thought I'd pop in here real quick and show some pictures of a cake I did a while ago. This was for a lady who likes to sew, so a sewing basket was the natural choice to make. So many fun things to make for this cake. There was a pincushion (with pins), needle and thread, scissors, buttons, thimbles, lace, fabric and a measuring tape.


The sides were covered in a chocolate buttercream basket weave and all the decorations were either gumpaste of fondant. This was a fun cake to do and I managed not to break the scissors. :o)

Till next time...God's love and blessings!

Thursday, October 27, 2011

Gifts for my Sister

Today I thought I'd post something that wasn't a cake. Yes, believe it or not, I do other things besides make cakes. Although, recently, the cakes seem to have taken over. Anyway, a while back I made some gifts for my sister just because she is the greatest sister ever. She is much more of a jewelry person than I am so I decided to try making her some earrings.

 I stamped an image onto some shrink plastic (remember shrinky dinks?!), colored them, cut them out and shrunk them down. Then I used some beads and wire to turn them into earrings.


I have done some shrink plastic before, but I found that the ink wore off after a while, so I found that it is best to cover the image with Stampin' Up's Crystal Effects or another type of clear drying glaze. Before these dried, I sprinkled glitter all over them. Everything looks better when it's sparkly. :o)

If you look close you can see the sparkles. 
I used watercolor pencils to color these in before shrinking them.

I also wanted to make her a keychain, and I knew exactly which stamp to use. This image is from SU's "The Nicest Things" stamp set and I bought it knowing I would make something for my sister with it.


Sorry for the poor quality photos. My camera couldn't decide on what it wanted to focus on. I hope my sis has enjoyed her new jewelry. I think I may have to make some more for me and possibly some Christmas gifts.

Till next time...happy crafting and God's love and blessings!