Saturday, November 21, 2009

Christmas Workshop!

Between taking care of sick family and making cakes, I've been busy trying to finish the projects for my Christmas Workshop. I still have 2 full sheets of patterned cardstock to play with, but I think I have enough done to post pictures and you will simply have to be surprised by the last few projects. :o)

Here's a shot of what I have so far. You can click on the image to see a bigger picture. I think the angel ornament is my favorite.


There's a basket with 14 cards and envelopes in it, a 6 x 6 envelope album, a mini fold out album, 2 calendars, a "mug" of cocoa, 2 ornaments, pull treats, a lip balm "purse", and several goodie boxes. Here's some inside shots of a few.

The 6 x 6 envelope album:


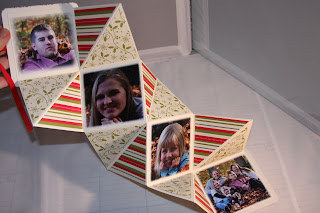
and the fold out album:

Here's the 14 cards.

As I mentioned in the previous post, there are 2 kits available, one for those far away and want me to mail a pre-cut, pre-stamped kit with instructions, and one for those who can come to my workshop to assemble their goodies. The dates for the workshops are listed below, please RSVP with the date and time you would like to come.

Thursday, December 10 10 am - 7 pm
Friday, December 11 10 am - 7 pm
Monday, December 14 10 am - 7 pm
Tuesday, December 15 10 am - 7 pm

You may choose any time that works best for you on one of these dates. I put 7 pm as the ending time simply meaning that that is the latest I want anyone to arrive. This class will take 3 - 4 hours so if you come any later than that, it will be a VERY late night for us. Also note that you will need to bring your own adhesive and you will probably need a refill or two. There are a LOT of projects here. Also, for the 3-D items, I recommend "sticky strip" or something equally as strong. I can order this for you from SU if you like. Let me know when you reserve your spot for the class.


IMPORTANT NOTE: Because this class will require a lot of prep work on my part, I will need to have all reservations and payment no later than November 27th. The class fees are: Mail out kit-$60, workshop kit-$50.

Don't forget, the first 10 to reserve their spot/kit, get an extra project, supplied by me. And, as usual, I always have a special gift for anyone who introduces me to a new friend either by workshop or by mail.

Tuesday, November 10, 2009

Back in the Swing again!

I am so excited! I'm teaching again. :o) I held my first two card classes since we moved back Stateside. It was a lot of fun, and it really got the juices flowing for some new ideas for classes. Unfortunately, I'm a little behind the ball on Christmas planning, so this first class might seem a bit rushed, but I have so much planned for it and I want to make sure everyone is able to get their goodies finished in time for Christmas. So, I'm going to tell you about the class before I even have samples to show you.

So, with that in mind, here's most of the details. I am planning a Christmas Workshop designed around the Stampin' Up! Simply Scrappin' Kit Christmas Jingle. At first the plan was to make a 6 x 6 envelope album and some Christmas cards with the leftover pieces, but once I started planning the layouts and designing everything, I realized there was a LOT of supplies left over in the kit. Not wanting to waste anything and knowing how so often we finish a project or two and then put the remaining kit away never to be seen again, I decided to see what else I could come up with. WOW! You sure can get a lot of goodies out of one scrapbooking kit! Here's my list so far:

6 x 6 envelope album
14 cards with envelopes
decorative basket to display Christmas Cards in
mini fold out album
cocoa "mug" gift set
mini treat box
post-it clipboard
magnetic calendar
chapstick gift holder
pull treats (for chocolate bars, microwave popcorn, cocoa mix, etc.)
candy wrappers (for chocolate bars)
ornaments
and tags

And, I'm not done yet! Unfortunately, I just ordered the kit, so I'm designing all of this on scratch paper and don't have any samples to show you. As soon as my kit gets here I will put everything together as quickly as I can and get some pictures posted. In the meantime, I wanted to get the word out for those of you who live quite a distance that might be interested. I am planning on putting kits together for you, stamping the needed pieces and even cutting everything out and sending it out to you along with the needed instructions. That way you won't have to have the stamps and punches to finish the projects. All you will need to provide is adhesive and the goodies to go in the gift boxes (ie. cocoa packets, chocolate bars, etc.)

Right now, your kit will include:

the Christmas Jingle Simply Scrappin' Kit
15 yards (1 spool) of grosgrain ribbon
20 envelopes
10 clear rhinestone brads
7 sheets vanilla 8.5 x 11 cardstock
and a few little extras (clip, acetate sheet, etc.)

For those who live farther away and want the pre-stamped, pre-cut kit, the cost will be $60. This will include shipping and WI taxes. Yes, guys, we have to pay taxes now that we're back in the good ole USA, and since the supplies will originally be sent to me, it will be WI taxes. I will need to have a check or credit card info by November 20th so that I will have time to prepare the kits and get them out to you by the end of the first week of December.

For those of you who live closer by and can come to my house for the workshop, the kit will be $50. Your kits will be pre-cut, but there will be some stamping and punching involved along with the assembling. Since I expect this class to be a bit longer than a usual workshop (maybe 3-4 hours), I am setting aside several different dates and times to be available and you get to choose the one that works best for you. I'm thinking the first week of December, but I will let you know more specific times as it gets closer.

I am very excited about this workshop! I've been having a fun time coming up with ideas and figuring out how to get the most out of the scrapbooking kit. I can't wait to have some samples to show you. Until then...

God's love and blessings,
Tammy

PS. The first 10 to sign up (with payment) will get a special surprise project in their kits!

Saturday, September 19, 2009

Punctual, I am not!

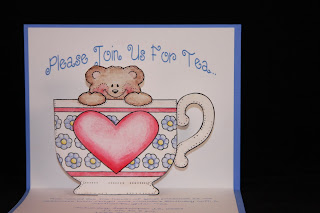
So, keeping on a weekly schedule, just doesn't seem to work very well for me. I mean to sit down and post something regularly, I really do, but it always seems that life just gets in the way. I guess if it didn't, I wouldn't have anything to write about! And today, I do have several things to show you. Last week's challenge was to watercolor something. Well, that I did--x7! I made invitations for the girls' Mother/Daughter Tea Party. Isn't this stamp cute?


This is the inside of the card. It's hard to tell in this photo, but the bear and cup are popped up off the background.

I made these little boxes to hold the treats Angel made for each of the guests. They were made using one of the Big Shot dies from Stampin' Up!


Here's a close up of the jewelry items Angel made. She made the bracelets for the little girls who attended, and the key chains for the older girls and the Moms. Aren't they cute? The butterflies were cut out with a Stampin' Up Big Shot die from shrink plastic. The large ones were stamped with Proverbls 31:30, which is a memory verse that we talked about at the party, and then they were shrunk.


I also made little teapot cookies to go in the goodie bags. I tried a new sugar cookie recipe that used cream cheese. They were really good!


Here's a picture of the items we put in the goodie bags. Each girl got either a bracelet or key chain, some cookies, a butterfly wand (I wish I had taken another picture of all of these together--they were so cute!), a fan that they made at the party, and a picture frame. Actually, they colored the frames at the party, I am printing up pictures I took of each of the girls and will give them back to them along with the girls' "thank you" notes.

I made small flower arrangments in some of my teacups and attached smaller versions of the butterflies to them. We also attached butterflies all along the sheets that were hanging along the garage walls. You can see a picture of that on my family blog.


Oh, I almost forgot to add pictures of the cake! Everything on this cake is edible (except the toothpicks holding the handle and spout on)--including the cup, saucer and spoon. This cake took several days to make, and I wasn't sure it was going to come out. The humidity was too high, and the fondant did not want to harden for me. Next time I attempt this cake, I would really like to have some petal dust to do the decorations on the china. I had to use food coloring, which doesn't blend very well, and definitely is not very forgiving.


Here's a close up of the cup and spoon. I modeled the spoon with one of my real teaspoons. The cup and saucer were also molded using a cup and saucer that I had. It was actually pretty easy to make them, just nerve wracking wondering if they were going to dry in time. By the way, you can click on any of these photos to see a really big picture of them.


Well, it's getting late so I should close this here, but first, a new challenge. This week's challenge will be to work on something holiday related. It could be Christmas cards or maybe a hand made gift you would like to give someone. It's never too early to start getting ready. The more you get done now, the less hectic December will be!

I will leave you with the scripture verse we focused on at the girls' party. "Charm is deceitful, beauty is passing, but a woman who fears the Lord, she shall be praised." Proverbs 31:30

God's love and blessings.

Friday, August 28, 2009

Challenge #5

Ok, so either I'm VERY late for the last challenge, or I'm early for the next one. Let's go with the second option there. :o) Things have been a bit busy here with school preparations. Our school books were in dire need of an organizing specialist, but since there are none around, and I'm the resident teacher, I simply did my best at sorting through and figuring out what should go where. Twelve years of curriculum is a LOT of books!

Anyway, with the books all sorted, cataloged and put back where they belong, I didn't have much time left for finishing my challenge, but I managed to get it done. See:

This was probably the easiest layout I've ever done. I had printed this photo out with the scripture verse on it a few weeks ago to go in a frame here in the house, but printed it too large and it didn't fit so I decided to put it into one of our albums. All I did for this layout was matt the photo, emboss the dark blue strip on the side and add some snowflake embellishments that I had.

Let's see, this week's challenge will be to do some watercoloring on a project. You can use watercolor pencils, ink, watercolor crayons, or grab your kids' watercolor paints and have some fun. Michelle's birthday is coming up quick, so I'm sure I will get some watercoloring done and have some projects to post for you next week. Till then--God's love and blessings.

Monday, August 10, 2009

Week #4

Aaah! I can't believe I didn't get this posted yesterday. I even had my projects all done and pictures taken and uploaded and ready. Oh well, better late than never. I'm so excited to have my sister joining us for these challenges. (Hi Pam!)

Here's a picture of the layout I did using a chipboard letter.

I had a hard time figuring out how to incorporate a chipboard letter onto this layout because there were too many options, but I did it! I had fun using my SU butterfly die and some Brilliance ink I bought a long time ago. You can't see in the picture, but the ink on the letter and edges of the butterflies is a very iridescent red and gold color. I followed Sonja's lead and started a photo album on my Facebook just for my Challenge projects so they are all in one place.

This week's challenge is to use dry embossing on something. You can use a die cut machine with an embossing folder or do it the "old fashioned" way with a template and stylus, or any other way you know of dry embossing an image. Try it for your main image on a card, or a background texture.

Well, I picked up 2 new bookshelves yesterday and need to get my boxes of books unpacked and our school curriculum organized before I can play, so I better get off of here and get busy. Till next week...God's love and blessings.

Sunday, August 2, 2009

Sunday Challenge #3

I'm so glad Sonja has made it home safe and sound and has joined me in finishing these challenges. I hope we can get some more ladies to play along. Last week's challenge was to use ribbon. I did on a few cards I made, but forgot to take pictures of them before I sent them out. I did however finally finish a layout for one of the frames here in the house using a little bit of ribbon. It's an 11 x 14 frame, so I couldn't print a picture big enough to fit it and decided to do a layout. I loved the rose that was printed on this paper and didn't want the photo to completely cover it so I cut out the edge with an X-acto blade and tucked the photo under it. The ribbon simply helps soften the line where the 2 different papers come together at the bottom.


This week's challenge is to use chipboard letters. Cover them with paper, paint them, ink them, distress them, whatever you like, but use them on a project this week and tell me all about it. Since my printer is working again, I am hoping to get some of Angel's pictures printed and do a few pages for her album this week.

In other news, I'm hoping to get my Stampin' Up! business up and going again soon. I think I'm going to start with a card swap. I just got my new catalog in and am in the middle of sorting through my retired stamps and reorganizing them. Hopefully I'll have that done today and start making a few things with my current stamp sets. It's good to get my office put together and have a place to be crafty again. :o) Especially one with such a beautiful view to look at while I'm working!

One more bit of crafty news. Today was the first Sunday of the month which means we had "potblessing" at our church today and I made a cake honoring all those with a Birthday or Anniversary in August (which includes Mike and I--21 years together and he's still my Knight in Shining Armor!) I decided on a picnic theme for this month's cake. This was so much fun to do. I felt like I was back in art class at school again playing with play-do. :o) Here's a picture of it. I'm going to upload some close-ups onto our Picasa site if you want to check them out.


Well, I better close here and get busy on these stamps. Till next week, God's love and blessings.

Sunday, July 19, 2009

New challenge this week.

I am so excited! It came down to the wire, but I did meet my own challenge. I know Sonja didn't get a chance to do any crafting this week as she is driving all over the country right now, but maybe this will be inspiration for her when she returns (Hi, Sonja!).

Here's the project that I used glitter on.


It uses one of the new embossing folders from Stampin' Up! I embossed a piece of vellum and then cut off the area above the flowers. I then traced over the embossed image with a glue pen and sprinkled it with glitter. This card is going to my Sister and her hubby for their Anniversary this month. (Don't look, Pam). The ribbon on the side helps to hide the adhesive that shows through the vellum a bit.

This week's challenge will be to use ribbon-preferably ribbon scraps. You know, those little pieces left over from other projects. See what you can do with them on a new project this week. One of my favorite techniques is to fold a 2-3 inch piece in half and staple it to the side of a photo or other element on a page. I need to work on some pages in Angel's album, so I'm sure it won't be hard to use up some ribbon.

Well, have fun, and happy craftin'!

Sunday, July 12, 2009

Finally Settled

Yes, it's been a long time in coming, but we're finally settled into our new home. I don't think I can possibly explain in words how much I love this place. It's not what I thought was my "dream" home, but it is absolutely perfect! One great thing is that I have plenty of crafting space, and I was able to get most of my supplies well organized and easy to reach.

I just finished a super half-week with my crafting buddy, Sonja, and we were discussing how difficult it is now to get motivated to do some crafting now that we're so far from each other and the other ladies we used to scrap with. We've decided to try some virtual crafting together by challenging each other to do or use something specific each week and then post pictures of what we've accomplished. We both feel it would be a lot more fun if more people joined us, so from now on, I will do my best to post a challenge here each Sunday afternoon along with a reminder update on my Facebook page. Some challenges will be using specific products or techniques. Some may be finishing a certain number of pages or cards. I'm not sure what all the challenges will be yet. If you have any ideas, please let me know.

I would love to see the projects that you accomplish with the challenge. I don't know all the ins and outs of posting things on the web, but I do know that you can post pictures to your Facebook account or comment with a link to some other place where you have your pictures stored online (ie Picasa). You don't have to post pictures, just comment on here and let me know you finished the challenge. I know there's a lot of forums out there where you can do things like this, but I thought this would be more fun to do with the ladies I know so we can help motivate and encourage one another--besides, I also like seeing pictures of you and the projects you do.

So, in honor of the sale items I picked up at Archivers yesterday, this week's challenge will be to use glitter on a project. It can be a scrapbook page, card, or any other project that you've created. I can't wait to see who will play along with us. I'm going to close here. I've got pictures to print and glitter to glue!

Till I post pics of my projects...

God's love and blessings!

Thursday, March 5, 2009

Lookie what I made!!

I got this idea from the trinket boxes that several ladies were posting at Splitcoaststampers. I had been wanting some way of organizing my daughter's hair accessories by color to make it easier to find what we needed each morning, and this seemed the perfect thing. I made some changes to fit what I needed. First off, my drawers are considerably larger than theirs and I made 8 that all face the same way. I didn't want to have to turn the box around to find the color we needed.

I made a blue one for Michelle, and a purple one for her friend Helen's birthday. Here's a shot of the front. The drawer pulls were made by punching shrink plastic with a large flower punch and shrinking them down. They were attached with rhinestone brads and unused eyelets behind to pull them away from the drawer.

Here's the top. I used my Wishblade to cut out their names and my Sizzix to cut out the butterfly. I also used my Sizzix to emboss the front of Helen's drawers.


I decorated the sides with more punched out flowers.


Well, all I have to do now is get Helen's in the mail to her. (It's already a bit late, oops.)

I think I'm going to start planning some projects for classes. Lord willing, we will be settling into a new house soon and I can start teaching again. Yeah!!!

Till next time...

God's love and blessings!

Thursday, January 1, 2009

I've Been Scrappin'!

I don't have any projects to post today, but I did have to post to say that I've been scrappin"! It's been quite a while since I've had a chance to work on any albums, and I've really enjoyed a relaxing few days of playing and reminiscing. I think one of the benefits of being behind on the albums is that it gives me an excuse to go through pictures from years ago, and be amazed at how fast the time goes and the children grow.

Since the day after Christmas, I've finished 13 pages in Michelle's album which takes me about half way through her 2nd year (she's 5 now!). I'm in the middle of 4 more, but I ran out of adhesive so will have to wait till I can get some more. :o( I'll try and scan or get some pictures of the pages I finished a post a few next time.

Till then, God's love & blessings,